Do you need to measure laser power more accurately? With a laser power detector, the process is relatively straightforward. However, there are some important steps needed to ensure an accurate measurement.
The right tools for the job
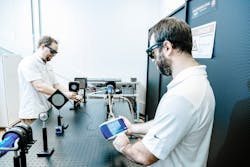
The first thing to do is choose a laser power meter. There are a large range of specialty power meters available and determining exactly which one will work best can be tricky. However, choosing the correct one is critical to getting an accurate and reliable power measurement for a given application (see Fig. 1). The main factors influencing the choice in detector technology include the laser’s power, beam size, and wavelength. For pulsed lasers, energy per pulse, repetition rate, and pulse width could also influence the choice. To find a durable product, it is important to check that the laser power detector will be able to handle both the energy and power densities.
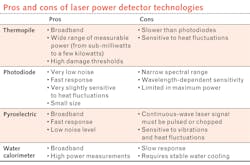
It is also important to understand the pros and cons of laser power detector technologies to ensure the best results for a given application (see table).Correct beam diameter
When selecting a power meter, think about what beam diameter is required for measurements. This is crucial for accuracy and using a beam diameter that is too small can damage the power detector, given the high-power density of a smaller beam.
On the other hand, a beam that is too large can lead to wasted power not being transferred to the detector. Ideally, beam diameter should be between 40% and 60% of the optical aperture area. This is the best way to optimize the absorption of heat by the power detector.
Set the wavelength
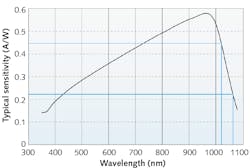
Selecting the power meter’s correct wavelength makes a difference as well, because the response of optical detectors is not the same for every wavelength. Detector manufacturers encode the spectral response inside a chip in the detector, and power meters use this correction factor to display the correct value at a specific wavelength. This is especially crucial for photodiodes, as their sensitivity varies greatly over the spectrum.
For example, with a silicon-based photodiode, it is possible to obtain the wrong measurement by a factor of 2 if the meter shows the wavelength was 1020 nm when it was actually 1064 nm (see Fig. 2).Warm up the laser and detector
Warming up is an essential part of getting the best results when measuring laser power because it can vary with time, particularly just after turning on the laser system. This is due to temperature and material changes within the laser as it reaches a balance with its environment. It is therefore recommended that laser power not be measured during the first few minutes after it’s turned on.
It is equally important to warm up the power detector. Making sure it reaches equilibrium with its environment helps acquire the most accurate measurements possible; otherwise, further heat transfer can interfere with the measurement process.
A laser power detector should remove heat efficiently—some systems come with fan or water cooling for this purpose. If the power meter does not, it is important to provide sufficient space around it.
Precautions for low power measurements
Keep room temperature as constant as possible to avoid positioning thermal detectors near fans, or any sources of heat or air convection. This will help null the effects of thermal drift and thus reduce thermal noise and measurement uncertainty.
Users should also avoid touching the casing of the detector or putting it in contact with a heat source, as this can create an offset in the measurements.
Isolating the detector from undesired radiation sources is important. Photodetectors can be affected by ambient lighting, and very sensitive broadband detectors can even react to people moving around the room. Optical filters and enclosures can block unwanted interferences and isolate the detector from heat and air currents.
One thing to keep in mind is to check if the chosen environment is suitable for power measurements, which allows characterization of the ambient noise by an acquisition (with laser turned off).
Zero the power meter
A laser power meter will feature a function that will allow the user to “zero” the device, eliminating the offset coming from the environment. It is important to use this after warming everything up appropriately and blocking the laser beam. It is also important to use a proper tool—not a hand—to block the beam.
If there is uncertainty about a measurement or a systematic error is suspected, it may be worth repeating the zeroing process as a check. For longer tests, it is recommended that zeroing be repeatedly carried out once every four hours, especially when there are changes in room temperature or lighting conditions.
Measuring laser power
The beam can now be unblocked and the laser power measured. Leave the beam unblocked for at least a minute ahead of time to ensure that everything is stable.
If the laser power meter has an anticipation or speed-up function, a full minute is not required, as the meter is able to work out what the measurement value should be. This may be useful in certain situations where a quicker measurement is needed.
Potential challenges
Laser power meters are very stable and should yield highly repeatable results. There shouldn’t be more than about half of a percent variation in power measurement; if it is larger than that, try re-zeroing. This may be required as a result of changes in the environment. Re-zeroing should help to identify whether or not this is the problem. Alternatively, the issue may be a result of the stability of the laser itself.
Double-check the following factors:
- Is the laser beam properly aligned and fully contained in the detector’s aperture?
- Is the correct wavelength entered in the power meter or software controls?
- Is the detector’s surface scratched or damaged?
- Was the detector recalibrated recently? How often this should be done depends on multiple factors, but the general recommendation is every 12 to 18 months.
And that’s it! Measuring laser power like an expert is in fact possible in just a few simple steps.


