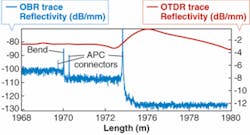
Luna Technologies (Blacksburg, VA) has taken its optical-backscatter-reflectometry (OBR) technology to new levels--the company’s improved instrument can now look inside a fiber-optic component with 10 μm resolution and is even sensitive enough to identify environmental changes in fiber-optic systems.1
Unlike an optical-time-domain reflectometer (OTDR), which simply looks at the reflected pulse from a laser sent down a fiber-optic link in the time domain, the OBR technology is based on optical-frequency-domain reflectometry (OFDR) and uses a tunable laser and an interferometer to probe reflections. Optical-backscatter reflectometry differs from other frequency-domain techniques in that it is sensitive enough to measure levels of Rayleigh backscatter in standard single-mode fiber. The OBR uses swept-wavelength coherent interferometry to measure minute reflections (less than 0.0003 parts per billion) in an optical system as a function of length, with spatial resolution down to 10 µm.
This technique allows the user to see and identify loss events such as bends, crimps, bad splices, connectors, and so on. Whereas standard OTDRs experience a dead zone when a reflective event saturates the system-preventing it from “seeing” the next reflective event-the OBR can resolve reflections without any dead zone. Because of its lack of dead zones and high sensitivity to backscatter, the OBR can measure insertion and return losses across individual or multiple events, even if they are only millimeters apart.
Other characteristics that separate the OBR from standard OTDRs include the ability to track the polarization state of the light as it propagates through the system and the ability to see the frequency response of the device under test.
The newest version of OBR can now make high-resolution measurements over a length of 2 km (compared to 500 m for the previous version). The dynamic range has also been improved to 18 dB, and sensitivity has increased to -130 dB while keeping sensing capabilities intact.
Because the OBR is so sensitive, an optical fiber can be monitored for point-to-point temperature and strain changes just by looking at the reflection trace of a particular fiber and comparing it to a reference trace. Link data can be archived in the software and recalled for comparison with a current trace. Temperature and strain changes as small as ±0.2°C and ±1 microstrain (the strain producing a deformation of one part per million relative to the same object in an undeformed state), respectively, can be determined.
“We are finding that users from a variety of industries, including telecommunications, aviation, and medical instruments have a pressing need for this type of measurement equipment because it is so important to reduce design cycles in product development and improve quality-control processes in manufacturing,” says Brian Soller, vice president and general manager.
REFERENCE
1. S. Duggleby, Luna Technologies Webinar: Discover the ease of reflectometry-the new, 2km, zero dead zone OBR from Luna, archived at www.lunatechnologies.com (April 19, 2007).

