DON DOOLEY
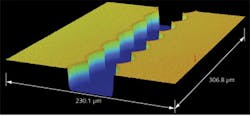
Applications for high-repetition-rate pulsed diode-pumped solid-state (DPSS) and fiber lasers have exploded in recent years. These lasers are used in any number of industries for applications including thin-film ablation, micromachining, laser marking, micro-via drilling, solar-cell scribing (see Fig. 1), and lidar, among many others.
What makes them so attractive? They're small, fast, efficient, emit at many different wavelengths, and run at high repetition rates (rep rates). They can precisely process materials with feature sizes in the few-microns range and with almost no collateral heating. Because of the short (pico- to nanosecond range) pulses, peak powers obtained can be in the hundreds of megawatts—levels at which each pulse is essentially ablating the material by an optical process where multiphoton absorption excites the electrons in the material, directly breaking molecular bonds.
These lasers can do a large amount of work in a few milliseconds with thousands of pulses emitted in that short span of time. They can be used to make or break "vias" in memory chips in a few microseconds, provide a scribe line or edge isolation for thin-film solar cells on the fly, capture the contour of land using lidar techniques during a flyover, and much more.
What is meant by "high rep rate"? For example, Q-switched DPSS lasers are capable of operation at from 1 to 300 kHz, while fiber lasers can run at even higher rep rates in excess of 500 kHz. However, the majority of applications today specify rep rates of 50, 100, and 200 kHz. Pulse-energy levels range from a few nanojoules to several millijoules, while the wavelengths of choice typically lie between 266 and 1550 nm.
Every high-rep-rate application has particular performance parameters that are critical to it: These can include pulse-to-pulse energy stability, pulse jitter, missing pulses, and pulses below an energy or energy density threshold. All or many of these laser characteristics can drive the quality of the material processing application.
How does one measure these parameters in real time? Until recently, this was very difficult to do: Engineers had to resort to using thermal power meters to measure average power; fast photodiodes to measure rep rate and relative intensity; and fast, expensive digital oscilloscopes to capture the shapes of a few pulses. They then had to make any number of assumptions about the pulse shape and try to calculate the pulse energy and pulse-to-pulse stability. After all that work, they'd end up with just an estimate of how the laser was performing.
New circuitry for fast response
A different approach now exists that does not rely on thermal power meters; the result is greater simplicity, fewer assumptions, and greater accuracy. Creating this new type of instrument required the development and verification of a family of very fast pulse-energy detectors that could integrate nanosecond and shorter laser pulses in a few hundred nanoseconds, and then be ready for the next pulse.
This fast response was accomplished by using small, low-capacitance detectors designed into a circuit that integrates the detector current impulse on a load capacitor. The resistor-capacitor (RC) characteristics are critical and are set so that the rise time of the voltage output is a few hundreds of nanoseconds and the fall time a few microseconds. This allows the instrument to accurately measure at up to 230 kHz.
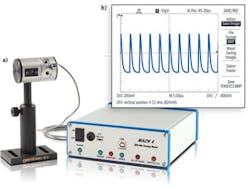
The instruments—the Mach 5 and Mach 6 digital joulemeters and fast M5 and M6 energy probes (see Fig. 2)—are capable of accurately measuring pulse energy with 12 bit resolution at up to 130,000 pulses per second (pps) and 230,000 pps, respectively. The energy probes include silicon (spectral range of 355 to 1100 nm) or indium gallium arsenide (InGaAs) photodiodes (1000 to 1600 nm) and fast pyroelectric thermal detectors (350 to 2500 nm). These probes measure from the nanojoule to millijoule level with a repeatability better than 1%.The instruments can capture and store up to 4 million pulses at the maximum rep rate; LabVIEW (National Instruments; Austin, TX) applications software then processes the data and displays them in a number of forms, including a strip chart, histogram, statistics, fast Fourier transform (FFT), and others. (The Mach 5/Mach 6 software is standalone and includes a set of LabVIEW drivers for those who want to integrate these instruments into their existing laser test setup or system.)
Thermally compensated probes
Another design necessity was to maintain the integrity of the pulse-energy measurements by compensating for the thermal effect of high average power levels at the probe. The output of any optical detector is dependent on its temperature and temperature coefficient; calibration of an energy sensor is typically done at room temperature, but, for example, if the temperature of the detector increases by 20°C, then the output (and therefore the calibration factor) may change by as much as 4%. To prevent this problem, the M5 and M6 probes incorporate a thermistor mounted on the sensor to monitor temperature; Mach 6 software can then apply a correction factor to the captured pulse information.
The digital electronics necessary to support these new energy probes had to be able to digitize microsecond-long voltage pulses and process them for accurate peak, baseline, period, and temperature measurement. In addition, the new instrument had to be able to store data at high rates in real time-for example, 4 million data points in 20 s (a 200,000 pps data rate)—and then download the data to a PC in a hurry to make room for the next set, requiring a full-speed USB 2.0 connection. Raw data captured include pulse energy, a time stamp, and the probe temperature.
Life-test mode
The FFT algorithm in the applications software enables the user to investigate the cause of periodic fluctuations in the laser output. For manufacturing engineers, the software includes a "life-test mode," allowing the user to set up a customized, long-term energy-stability test of the laser system. Start and stop times are set, along with the number of pulses per batch and a batch time interval. Measurement parameters of interest are also chosen, and the test, which could take hours or days to complete, is initiated. The end result is a full set of data in a tabulated format.
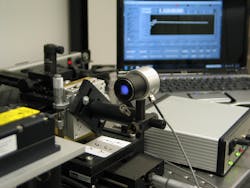
Some high-rep-rate laser applications incorporate lasers that emit at wavelengths far from the visible—for example, deep ultraviolet (DUV) or far-infrared (IR). These applications require a change to the optical front end of the M5 and M6 probes. We developed a UV-grade optical diffuser for use with UV lasers—for example, the 266 nm fourth harmonic of the Nd:YAG laser (see Fig. 3). For those working with pulsed carbon dioxide (CO2) lasers at 10.6 μm, the fast pyroelectric detector can be paired with a diffuse gold integrating sphere. In either case, the real-time pulse-energy data can be captured and analyzed.As applications for high-rep-rate lasers continue to expand and laser rep rates continue to increase, the need will arise for even faster digital energy meters. The inquiries are already coming in, and new approaches to developing faster instruments are being investigated. It would not be surprising if 2013 produces an instrument that can measure at rep rates approaching 1 million pps.
Don Dooley is general manager of Gentec-EO USA Inc., 5825 Jean Road Center, Lake Oswego, OR 97035; e-mail: [email protected]; www.gentec-eo.com.


